Warning
The databrowser will reach end-of-life December 31st 2023.
The Sesam Databrowser
High level overview / Introduction
The Sesam Databrowser is a generic browser that lets you inspect information as it exists in the data hub. The interaction principle is a combination of search and traditional navigation.
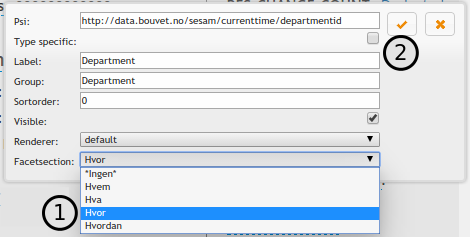
The startpage
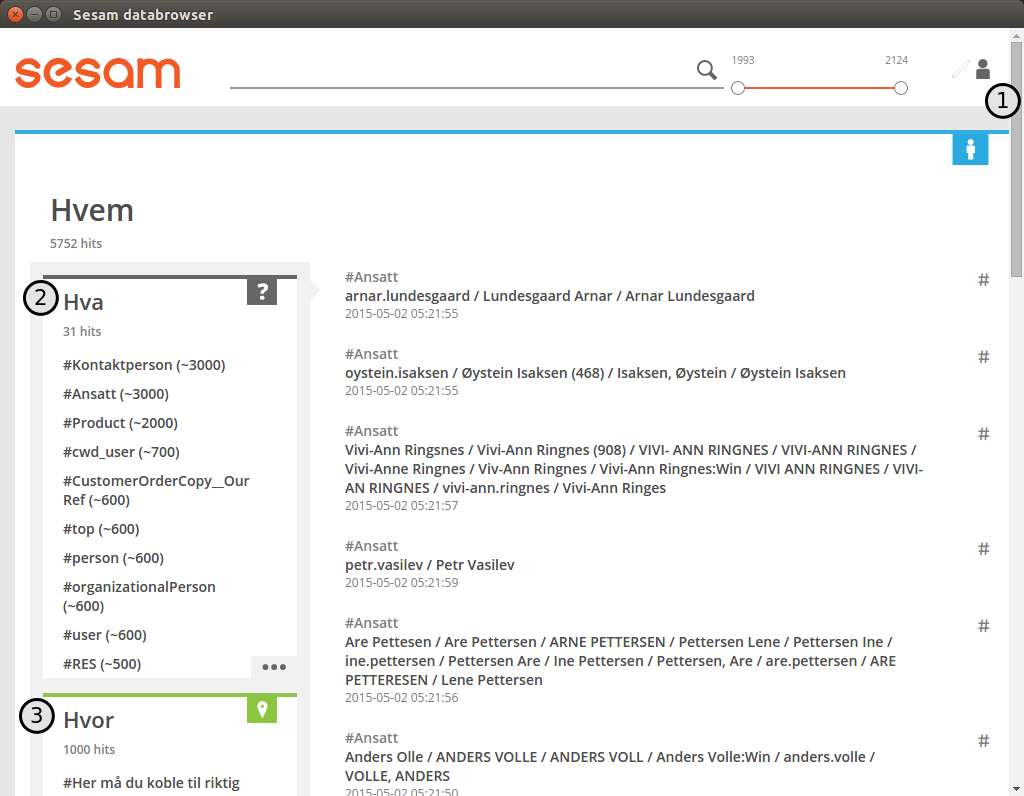
This is the first page you see when loading the databrowser url.
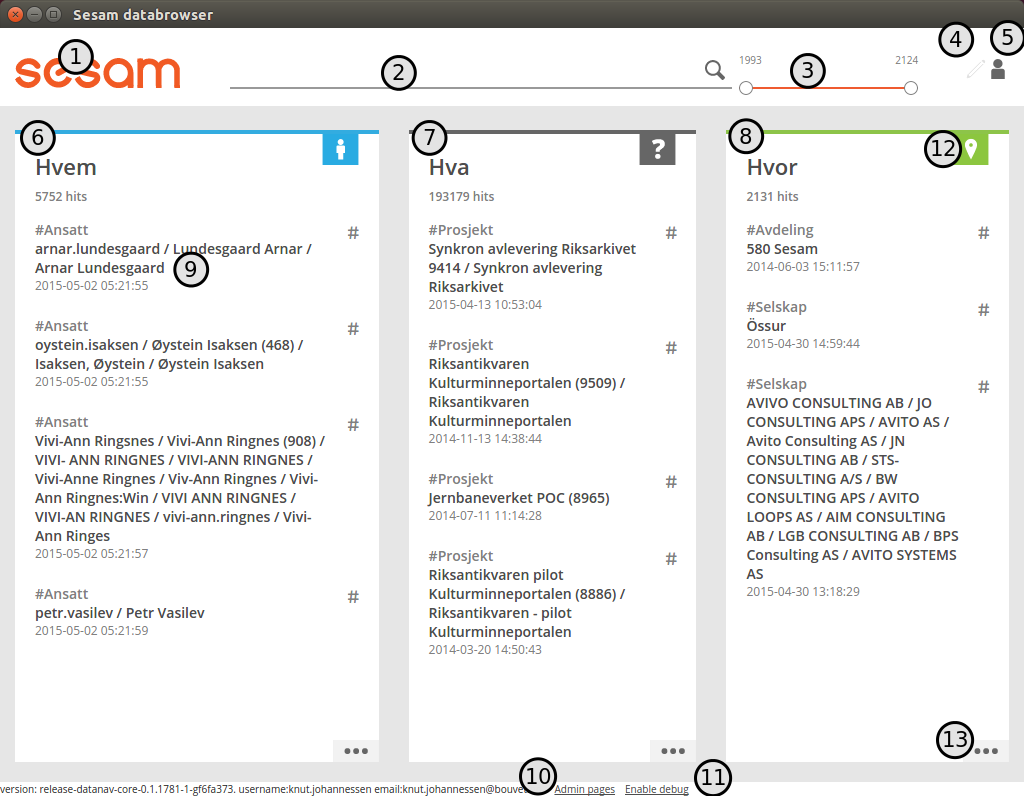
Screenshot of startpage
This page gives you a little bit of everything that is relevant to your user account.
The logo. This is always displayed and links to the startpage.
This is the search field
The date filter lets you filter the results by time
Toggle edit-mode on/off. Edit-mode is used when configuring the databrowser.
Link to the item that represents the logged-in user
(6), (7) and (8): Sections that results are grouped into
A searchresult
link to the admin pages
Toggle debug-information on/off
Section logo
Section “more” link
The sections
The searchresult items each has a type (“Ansatt”, “Prosjekt”, “Avdeling”). To organize the searchresults, the databrowser splits the searchresults into separate sections, based on the item types.
There will typically be three sections present: “Who”, “What” and “Where”. (6, 7, 8 in the startpage image above).
The “Who”-section will typically contain items that represents people (“Employee”, “Manager”, etc).
The “What”-section will typically contain items that represents things (“Project”, “Task”, etc).
The “Where”-section will typically contain items that represents places (“Department”, “Country”, etc).
A searchresult
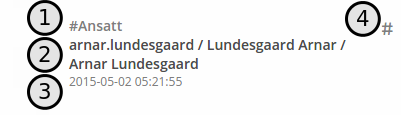
Searchresult items (9 in the startpage image above) contains the following information:
searchresult item
The type of the item. This is also a link for filtering image based on the name of the type.
The title(s). This is also a link to the itemdetail image for the item.
The date(s), if available. This is typically a last-modified date.
A link for filtering image the searchresults based on the items title.
Doing a search with a searchtext
You can do a text-search by entering a text in the searchtext input field (Element (2) in the startpage image above). The searchresults in the sections will update automatically as the user types in a searchtext. If the searchquery results an a section containing zero searchresults, that section will be hidden.
Narrowing a search with the daterange slider
The daterange slider (Element (3) in the startpage image above) lets you narrow the searchresults based on a daterange.
daterange slider
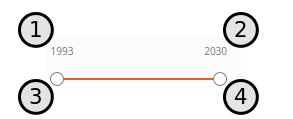
The first (1) and last (2) year in the searchresults are displayed at the top of the daterange-slider. You can use the handles (3) and (4) to narrow the daterange, like this:
daterange slider
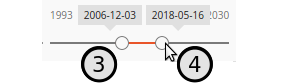
As you drag the start-date and end-date handles back and forth, the searchresults will be updated automatically.
Focused section
To see more results from a section you can click/tap its icon or more-link (Elements (12) and (13) in the startpage image above . This is called “focusing” on the section.
When a section is focused, the other sections gets hidden, and all the searchresults in the focused section is available. We use “infinite scrolling” to show all the searchresults: when you scroll down more searchresults are fetched from the server and added to the end of the list of searchresults.
In the image below we have focused on the “Who”-section:
focused section
A number of things change when focusing on a section:
A vertical scrollbar appears in the browserwindow, to indicate that the user can scroll down to see more searchresults.
and (3) Smaller boxes (called “facetsections”) are displayed inside the focused section. The facetsections contains facetvalues (4) that lets you filter image the searchresults on things like item type.
Facetsections
The facetsection displays one or more filters that can be applied to narrow down the number of searchresults. The number after each filtername gives an indication on the number of searchresults that would result by applying the filter.
The purpose of the filters is to only display items that is connected to the item that the filter refers to. The most common usecase is to filter items based on their type. (An item’s type is described by having the item refer to another item that represents the type).
You can apply multiple filters by clicking on the #Name of the filters you want. The searchresult will be the intersection of the searchresults you would get or each of the filters on its own:
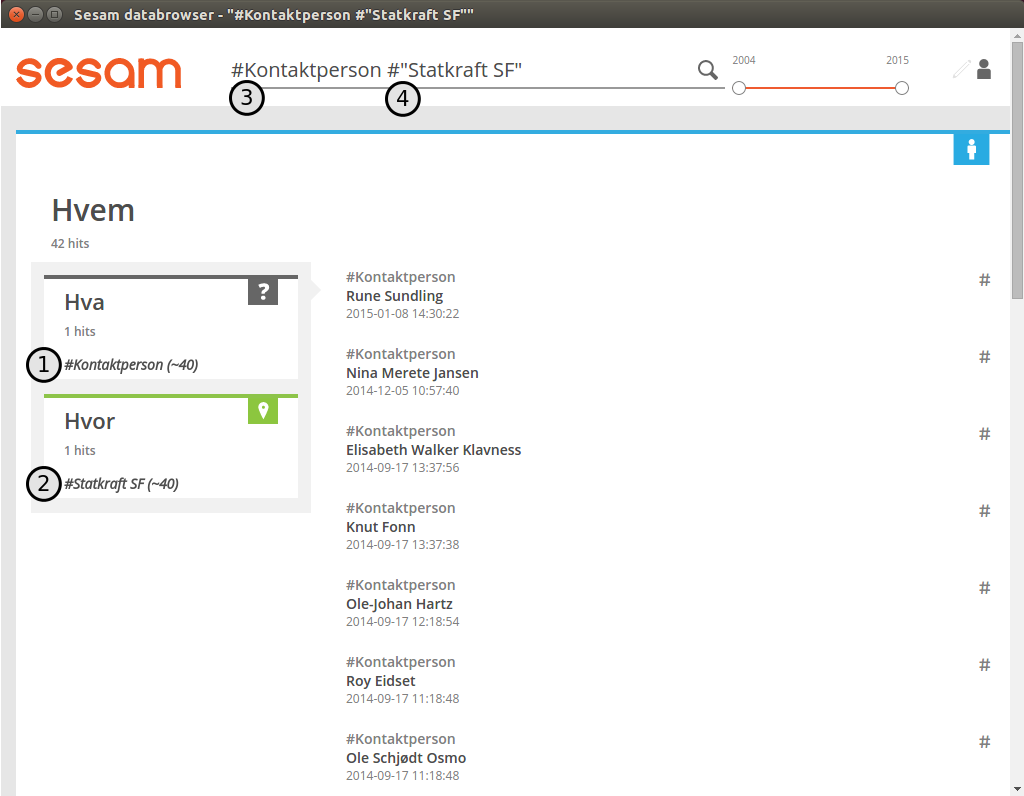
focused section with filters applied
Note that the selected filters (1) and (2) appears in the searchtext inputfield as text (3) and (4). Power-users can type in filters manually and get the same effect as clicking on a filter.
You can remove a filter by clicking on it again, or by deleting the text from the searchtext inputfield.
In the configuration chapter we will describe how to specify the filters each facetsection should contain.
More on Filters
What follows is a detailed and somewhat technical description of how the facet filtering is done. A user is normally not required to know the details here, but in some cases it can be very useful to know what is going on behind the scenes.
Each item is stored as a separate document in a search-index. Each document has a number of fields, but in this context only three fields are important:
“titles”: A list of the titles of the document (for instance a person’s name)
“ids”: The unique identifiers of the document
“entities”: The ids of other documents that this document refers to.
When the user uses a #Filter, the system will do the following:
Extract the title-strings from the #Filter. Examples: #SomeTitle => “SomeTitle”, #”John Doe” => “John Doe”
- Do a search for documents whose “titles”-field contains the exact title as specified in the filter. Make acombined list of all the ids of the documents.
Do a search for documents whose “entities”-field contains at least one of the documentids from step (2), and that also fulfills all the other searchparameters (daterange, etc).
Display the documents from step (3) to the user.
If more than one #Filter is defined, separate lists of ids are created for each #Filter in step (2). In step (3) a search is made for documents whose entities match at least one id in each of the lists from step (2).
The filter always starts with the hashtag (#) character.
If the title-string contains a space-characters, the title-string must be enclosed in double-quote (“) characters.
Only exact title-string searches are done. For instance: #orang will not give any matches on items with the title ‘orange’.
If the closing double-quote is missing, all the remaining text in the search-input field is assumed to be a part of the title-string.
Examples:
Search string |
Resulting title-string |
Resulting free-text query |
|---|---|---|
#orange |
“orange” |
|
#orange apple |
“orange” |
“apple” |
#”orange” apple |
“orange” |
“apple” |
#”orange apple” |
“orange apple” |
|
#”orange apple |
“orange apple” |
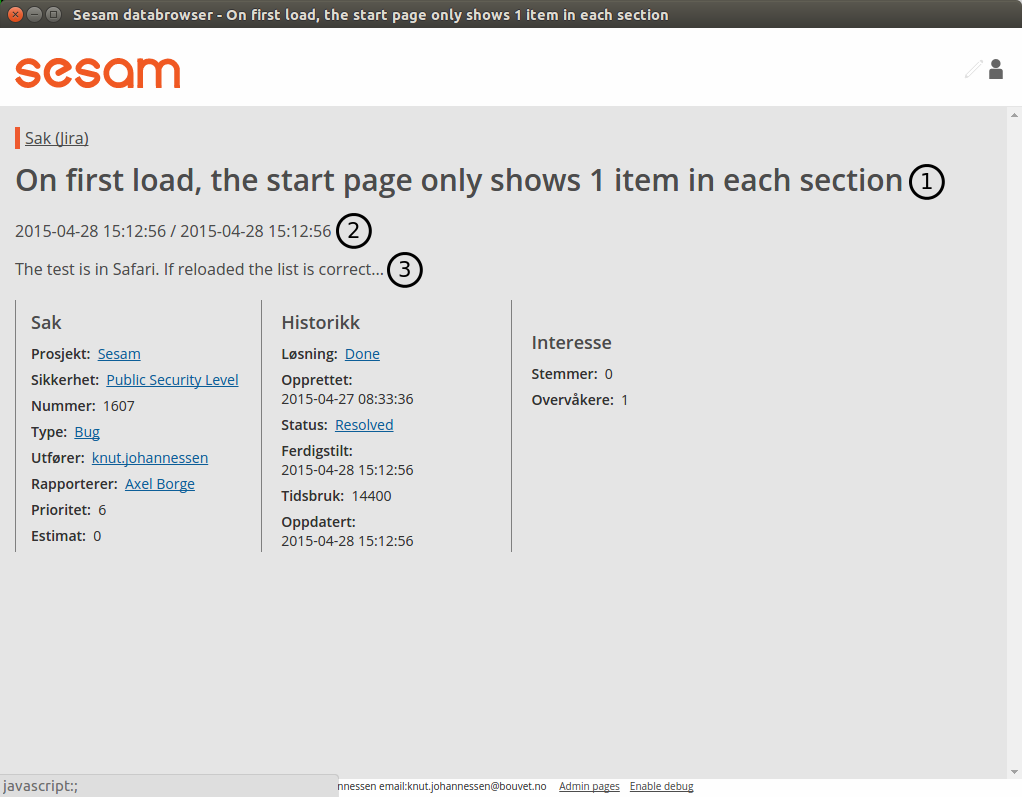
The itemdetail page
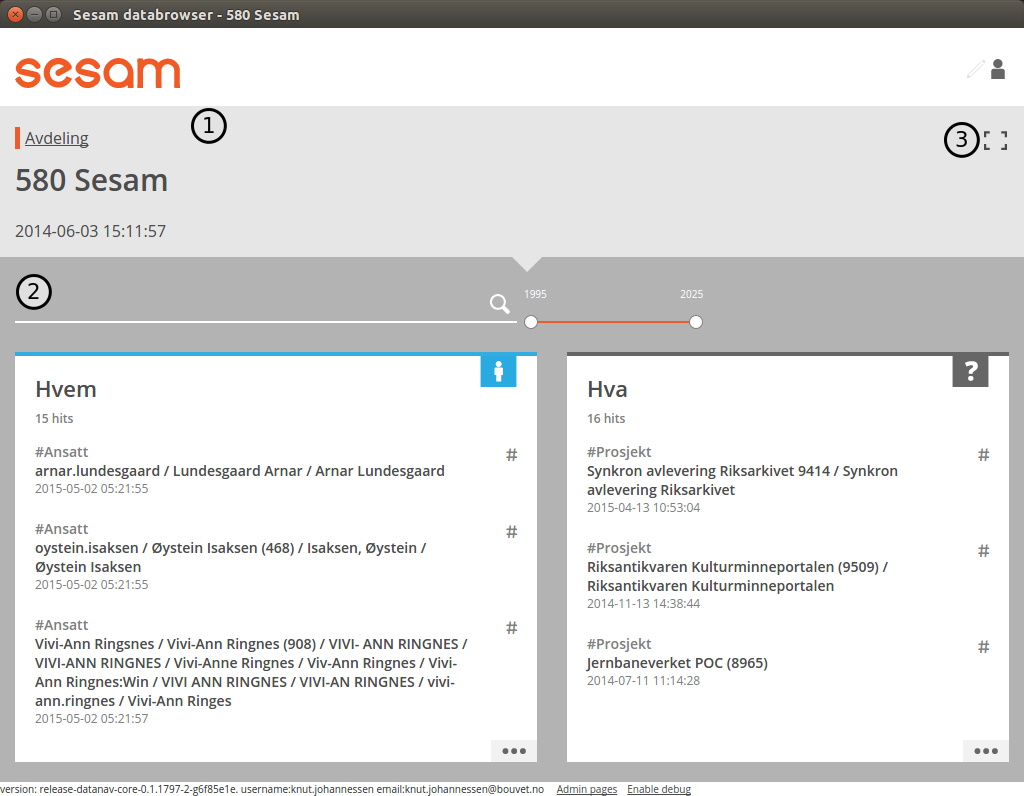
When you click on a searchresult item, that item gets selected, and is displayed on the itemdetail page.
This page displays all the attributes of the selected item, and the searchresults are filtered so that only items that refer to the selected item is displayed:
Itemdetail page collapsed screenshot
The itemdetail view.
Filtered searchresults.
Expand/collaps button.
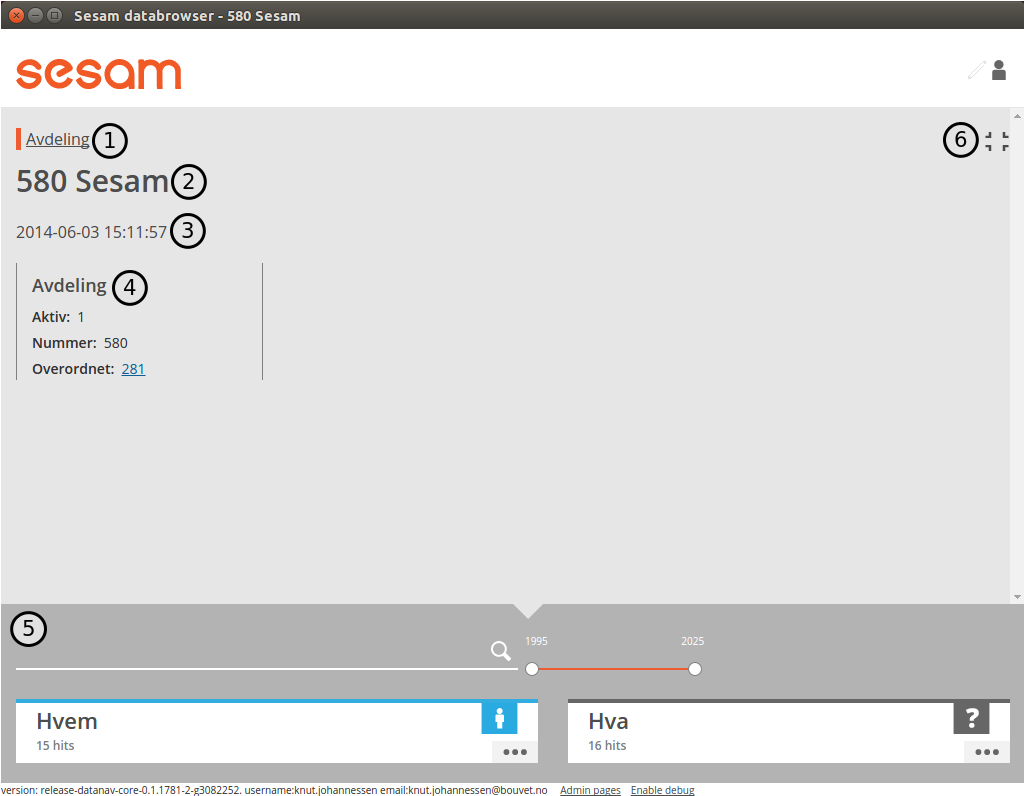
To see more of the selected item (and less of the filtered searchresults), you can click the Expand-button (element 3 in the image above).
Itemdetail page collapsed screenshot
When the itemdetail page is expanded, the following information is displayed:
The names of the type or types of the item.
The title or titles of the item.
The date(s) or the item. This is typically a “created” or “last changed” date, but this will be different for different itemtypes. Example: For an item that represents a calendar entry, the date will typically be the date the event occurs.
All the attributes of the item. The user can configure how the itemattributes are displayed; ordering, headers, etc can all be specified. This is described in detail in the configuration chapter below.
An overview of the searchresults. The searchresult is squashed down a bit to take as little room as possible, while still making it possible for the user to use the searchtext inputfield and the daterange slider.
The expand/collapse button.
Getting back to start
There are two ways to get back to the startpage after clicking around in the databrowser: The first is the web-browser’s backbutton. This will take you one step back toward the starting point.
Example:
Open the startpage
Click on the more-link on a section => this focuses on the section
Click on a searchresult item in the section => this causes the item detail page to load.
Click on the browser’s backbutton => this takes you back to the focused section as in step 3.
Click on the browser’s backbutton => this takes you back to the startpage
The other way to navigate is to click on the logo in the top left corner. This will take you directly back to the startpage, no matter which page you are currently at.
Logging in
TODO: explain how authentication works:
Authentication with google
Authentication with microsoft live
Authentication via a frontend proxy server
User object
The “user object” is the item that represents the currently logged-in user. This item will not be displayed in any searchresults, but can be reached by clicking on the little person-icon in the top right corner.
Configuration
Specifying what appears in the “Who”-section.
As mentioned in the chapter about “Sections”, the searchresults are organized into different sections (for instance “Who”, “What”, “Where” and “Why), based on the type of each searchresult item.
You can select which section an item type belongs to via the itemdetail page. This is done as follows:
Go to the startpage
Click on the first search-result in the “Where”-section. This opens the itemdetail view.
Click on the expand-button, if needed
Click on the “edit”-button (The little pencil in the top right corner of the browserwindow). This changes the view to “edit”-mode, see the screenshot below.
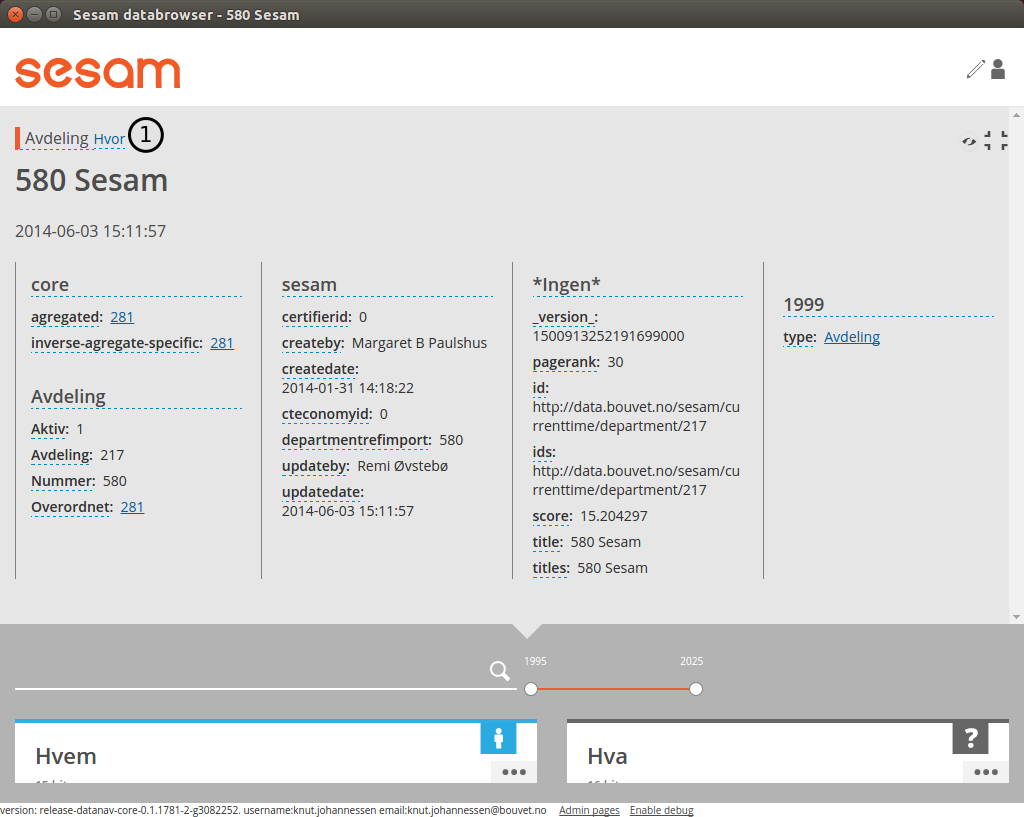
itemdetail page editmode
At the top of the itemdetail view all the types of the selected item will be displayed. After each type name is listed the section that items of that type will appear in. If the link after a type says “Unknown”, it means that that itemtype hasn’t been assigned to a section. The item may have more than one type, but at least one of the types will be assigned to the “Where”-section.
To change which section the item appears in, click on the sectioname link after the itemtype (element (1) in the screenshot above. This will open a dialogbox where you can select one of the “Who”, “What”, “Where” sections. Select “What”.
itemdetail page editmode
You can now return to the front page (by clicking on the sesam-logo in the top left corner) to see who your change has affected the searchresults: The item will now have been moved from the “Where” to the “What” section.
Note: It is a good idea to change the section back to the original value afterwards; all the changes you make apply to all users, not just to you. Click the browsers back-button to go back to the itemdetail page and select the “Where”- section again.
Specifying what appears in a facetsection via the itemdetail view.
The content of the facetsections can also be specified on the itemdetail page. In this example we will add the “Avdeling”-
Click on the “What”-heading to to focus on the “What”-section. The section will expand to take up the full width of the screen, and will display a “What” facetsection.
Lets assume that we want to have a “Hvor” facetsection that displays the values of the “departmentid” attribute.
Go to the front page and click on the first searchresult in the “Hvem”-section
Click on the “expand”-link if neccessary, to make the itemdetail view take up the whole browserwindow.
Click on the “edit”-button (The little pencil in the top right corner of the browserwindow)
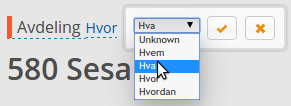
Find the “departmentid” label and click on it. This opens a dialog where you can configure the attribute.
Select “Hvor” in the “Facet section” dropdown (1) and click the submit-button (2).
Facet section dropdown
Click on the sesam-logo in the top left corner to go back to the front page
Click on the “more”-link in the bottom right corner of the “Hvem”-section
The “Hvem”-section will now display a “Hvor”-facetsection (in addition to the old “Hva”-facetsection). As before: If this is a production system is is a good idea to revert your changes afterwards.
Display fields
Some of the fields of an item has a special significance, and we often want to display the fields in a more prominent place than the generic field list. There are three different types of display fields:
itemdetail page with displayfields
“Title”-fields are displayed as the title(s) of an item. Typically usage: a persons full name.
“Description”-fields are displayed below the titles. They are typically used to display a longer text that describes the item somehow.
“Date”-fields describes the dates of the item. This can be things like “created date” or “modification date”, “birth date”.
A field is assigned to a display-field via the edit-mode in the itemdetail-page:
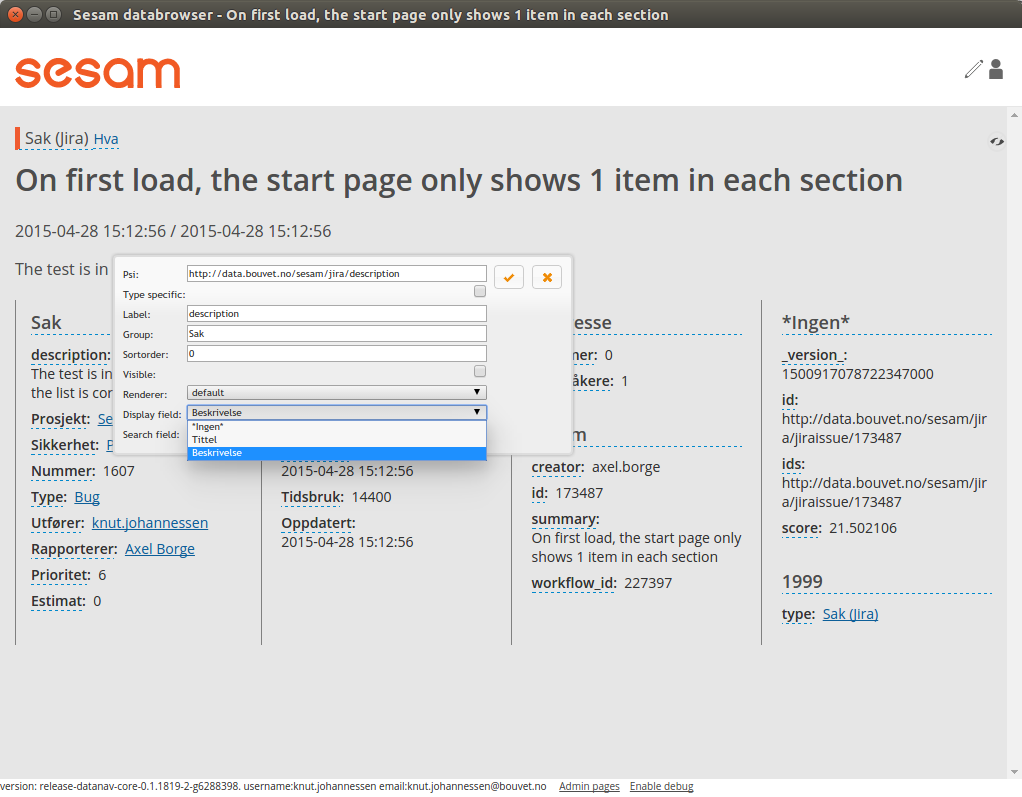
itemdetail page with displayfields
To change the display-field setting, select a setting from the dropdown (1) and click the submit-button (2).
Only the display-field settings that apply to a particular field; in the example above we are looking at a text-field, so the “Date” display-field setting is not available in this case.
Search fields
Search-fields are similar to display-fields, in that they are item fields with some special significance. But while the display-fields settings describes how a field is displayed to the user, the search-field settings describe how a field is used when searching for data.
There are three different kinds of search-fields:
“Title”: These fields are used when doing using a #TitleFilter. See the More on Filters chapter
“Date”: These fields are used when narrowing a set of searchresults with the daterange slider.
“Email”: These fields are used when searching for items that are related to the currently logged-in user. These items are then used to boost searchresults relevant to the current user.
Item attributes
In addition to the itemattribute settings we have already mentioned, there are a few others that we also must mention.
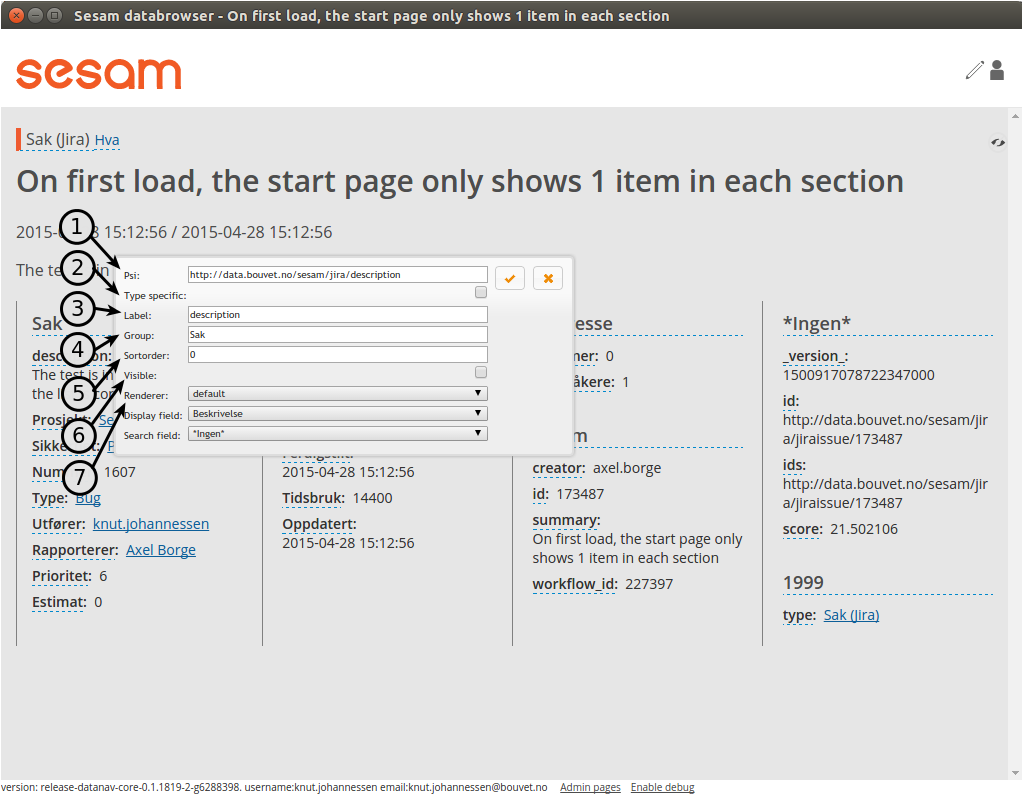
itemdetail page misc item attributes
The “psi” is the unique identifier of the item attribute type. This is readonly.
- “Type specific”: This checkbox specifies whether or not the settings should apply to all instances of the item attribute, or only instances of the attribute on items of the same type as the current item.This could for instance be used to give the “title”-attribute a label of “First- and lastname” for a person, and “Project title” for a project.
“Label”: The headingtext for the itemattribute.
“Group”: The name of the group the itemattribute should be place under. To create a new group, simply set this value to a new value. If no such group already exists, it will be implicitly created.
“Sortorder”: The attribute’s sortorder within the group.
Visible: A checkbox that specified whether or not this attribute should be displayed or not. (An attribute is alwasy visible in edit-mode, regardless of this setting)
Renderer: How the attribute should be rendered. This is normally set to “default”, which means that the system will attempt to guess at the best way of rendering the attribute.
Admin pages
In addition to the normal searchresults and itemdetail pages, the datebrowser also has some pages that is only visible for administrative users.
These are reached by adding “/admin_index” to the databrower address in your browser.
Example: if your databrowser is reached at https://databrowser.example.com, the admin-pages
will be at https://databrowser.example.com/admin_index.
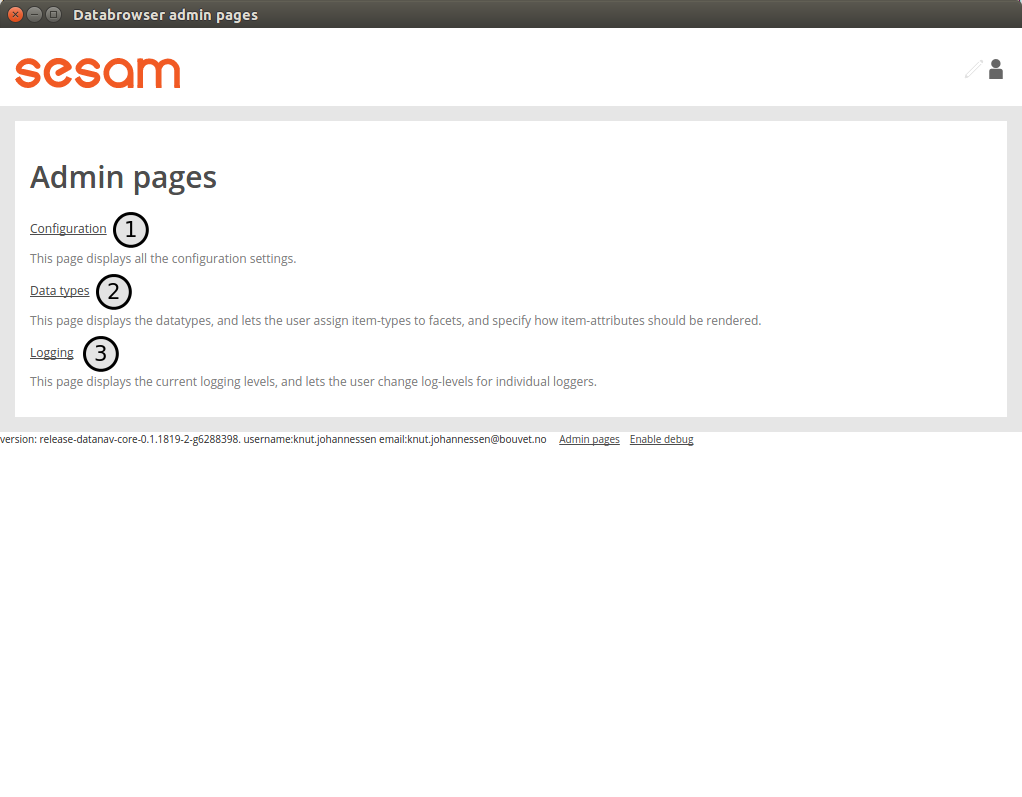
Screenshot of admin index page
Below we will look at each of the avialable admin-pages.
Configuration page
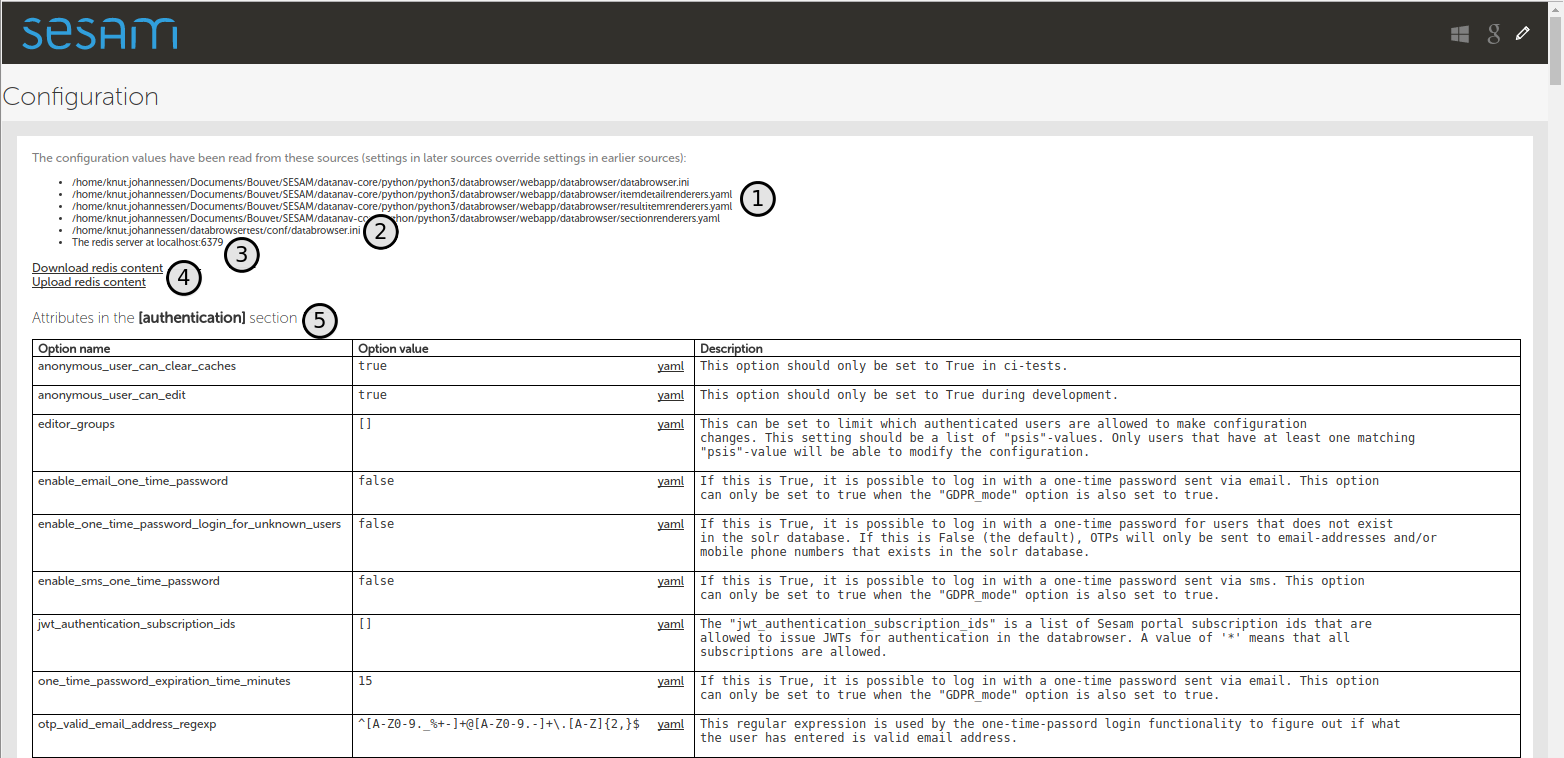
Screenshot of configuration admin page
This page displays all the configuration-settings of the databrowser. It is mostly useful for developers who are trying to track down some problem.
Near the top of the page is a listing of where the databrowser read its configuration from:
A list of the default configuration-files. These are the files that all installations of the databrowser shares.
A list of the installation-specific configuration-files. These files are supplied by each installation of the databrowser, and will typically override configuration-settings found in the default configuration-files.
The redis-server that the databrowser is connected to. When making configuration-changes via the gui, the changes are stored in this redis-server.
Links for downloading and uploading all configuration-changes to the redis server. See the Redis configuration upload page
A list of configuration attributes is displayed for each [section] in the databrowser.ini file.
Data types page
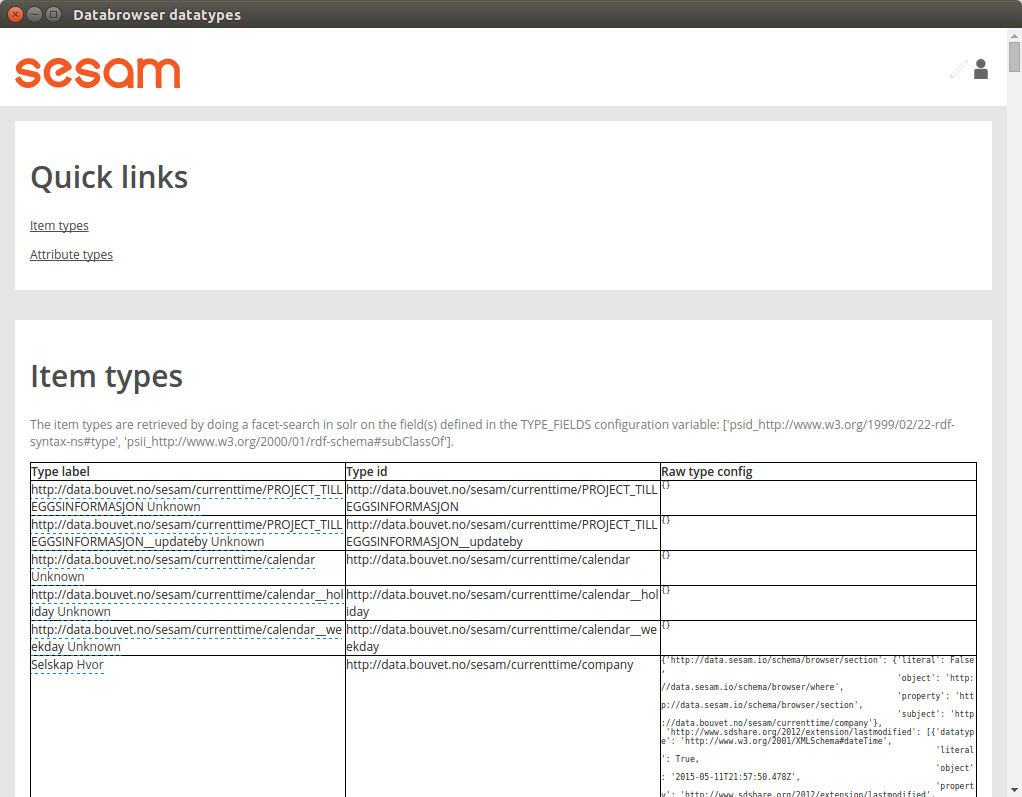
Screenshot of datatypes admin page
This page displays information about item-types and attriute-types, and lets you do the same configurations as on the itemdetail page. Sometimes it is easier to do such configuration here, since you don’t first have to find an item that has the item-type or attribute-types that you want to configure.
Logging page
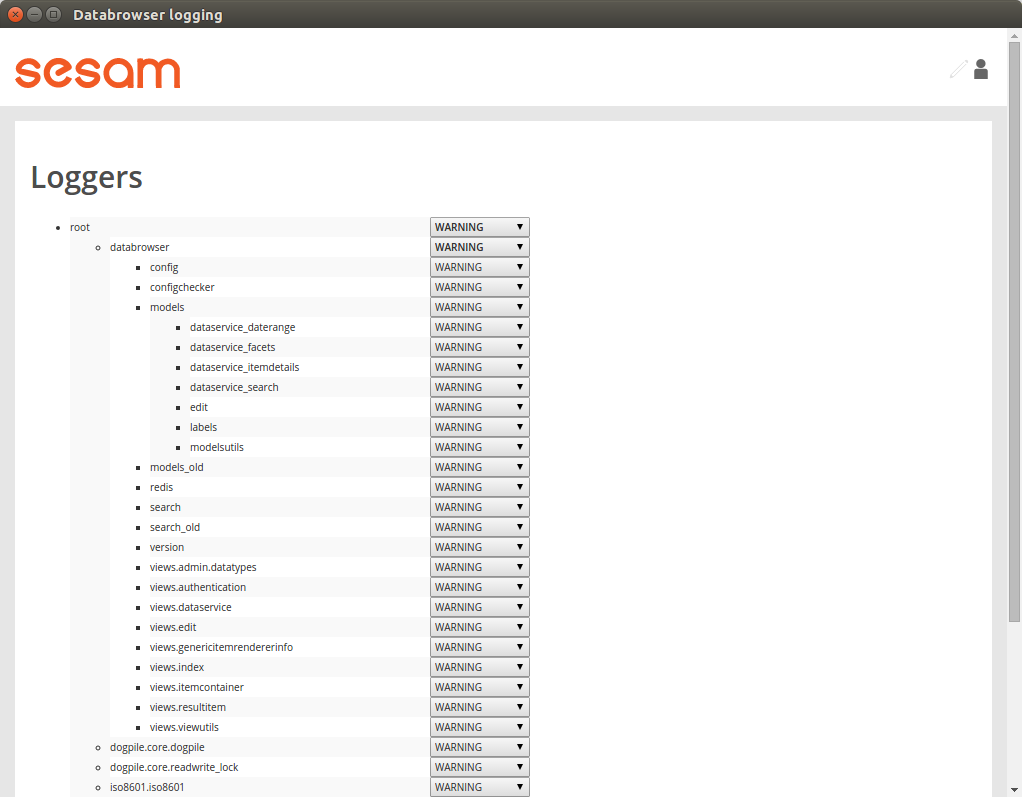
Screenshot of logging admin page
This page is only of interest to developers that has access to the server logs. It is not meant to be used by end-users. The page lets you change the log-levels of the various bits of the code. These settings are not persisted anywhere, and will be reset to their default values once the databrowser server restarts. To permanently change the log-levels you have to modify your installation-specific “production.ini”-file.
Debug information
The “Enable debug”-link on the bottom of the page will cause additional information to be displayed on the page. This can be useful when trying to track down problems with the configuration of the databrowser.
In the image below we have enabled debug information on the frontpage:
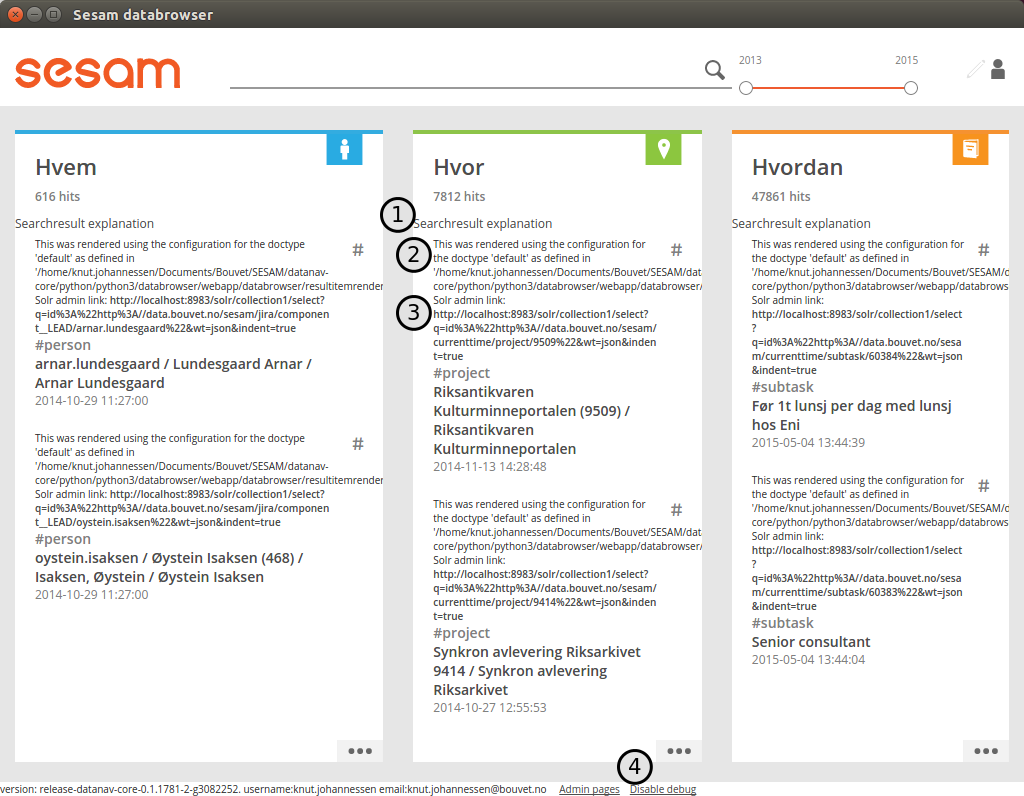
screenshot with debug information enabled
Explanation:
This links to a “searchresult explanation page” that shows detailed technical information about the search-queries that were run in order to generate the search results.
This debug-info text describes the settings the databrowser sued to render the searchresult item.
A link to the underlying solr-data of the searchresult item.
The link in the footer has now changed to “Disable debug”
Searchresult explanation page
This is a special debuginfo page that displays information about the solr-queries that was used to generate a list of searchresults. It is mostly useful for developers and administrators that needs to debug and tweak the search configuration.
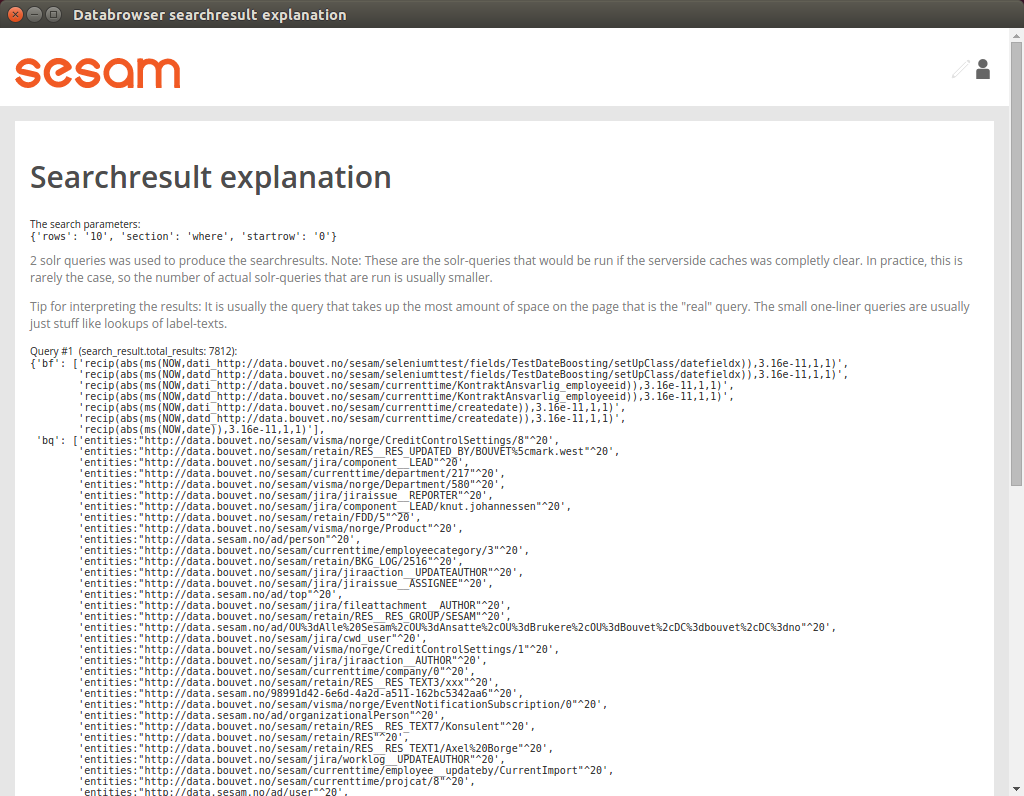
Searchresult explanation page screenshot
Redis configuration upload page
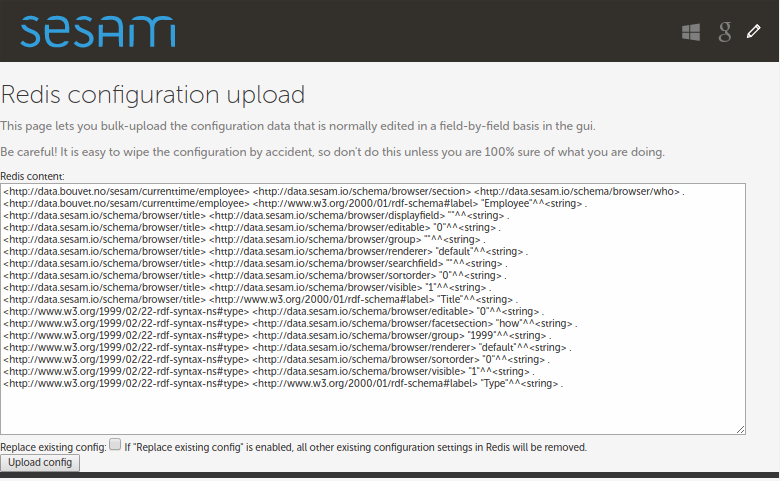
Screenshot of Redis upload page
This page lets you bulk-upload configuration settings directly to the Redis server. The current configuration is displayed in the textarea. You can either make changes to the existing configuration or copy/paste the config from somewhere else (for instance another databrowser instance).
This is useful if you have more than one databrowser instance and you want to copy configuration from one instance to another (for instance from a test-instance to a -instance).
Databrowser API Reference
- GET /
Generates the html page that contains the data access portal application. This is the only end-user facing html page; all other interaction is done via client-side javascript and AJAX calls.
- Query Parameters
q (string) – The user-entered searchstring
start (string) – The start-date(time) to use in the query. This must be specified as either a date on the form “YYYY-MM-DD” or as a datetime on the form “YYYY-MM-DDThh:mm:ssZ”. Documents older than this will not included in the searchresults.
end (string) – The end-date(time) to use in the query. This must be specified as either a date on the form “YYYY-MM-DD” or as a datetime on the form “YYYY-MM-DDThh:mm:ssZ”. Documents newer that this will not be included in the searchresults.
selected (string) – The id of the currently selected document, if any.
location (string) – A geographical location used to boost searchresults.
focus (string) – The id of the section that the user wants to focus on.
edit (string) – This parameter is set when the user has clicked on the “Edit” button. The DAP is then put into “edit”-mode, where the user can change various configuration settings (field labels, etc).
- Status Codes
200 OK – OK
- POST /
A POST request to the base url in a browser context (an HTML form POST action) will redirect the browser to the databrowser. After user authentication the databrowser will automatically send an access request on behalf of the user.
- Status Codes
200 OK – OK
- GET /login_implicit_flow
This is only used when logging in with openid connect providers that only support the “implicit flow” method. In that case the “id_token” is returned as part for the fragment-part of the url (the bit after the “#”-sign), which isn’t sent to the backend. The login_implicit_flow page contains a javascript snippet that extracts the id_token and calls the jwt_login endpoint.
- Status Codes
200 OK – OK
- GET /jwt_login
This is an internal page that is only used for development and testing.
- Status Codes
200 OK – OK
- POST /jwt_login
This is used when accessing the Data Access Portal from the the Management Studio”
- Status Codes
200 OK – OK
- POST /login/{provider_id}
This starts an openid connect authentication prosess. The user will eventually be redirected back to the ‘/login_callback/{provider_id}’ endpoint.
- Parameters
provider_id (string) – The name of the openid connect authentication provider. This must match a provider that has been configured in the databrowser.ini file.
- Status Codes
302 Found – A redirect to the authentication provider’s login-page.
- GET /login_callback/{provider_id}
The user is redirected back here after authenticating with an openid connect authentication provider.
- Parameters
provider_id (string) – The name of the openid connect authentication provider. This must match a provider that has been configured in the databrowser.ini file.
- Query Parameters
code (string) – A short-lived authorization code from the authentication provider. The DAP backend will use this code to retrieve the user’s information from the authentication provider.
- Status Codes
302 Found – Redirect to the DAP frontpage
- GET /otp_login
This is called when the user has clicked on a login-link in an email or sms.
- Query Parameters
email_or_mobilephonenumber (string) – The email address or mobile phonenumber of the user
otp (string) – The one-time password the user got on in an email or sms.
- Status Codes
302 Found – Redirect to the DAP frontpage
- POST /otp_login
This is called when the user has entered an email address or a mobile phonenumber in the gui and clicked the “Next” button.
- Status Codes
200 OK – The response is just an empty json object “{}”.
- POST /select_language
Stores the user’s selected language in the http session.
- Status Codes
200 OK – OK
- POST /update_loc
Stores the user’s geographical location. This is used to avoid having to ask the user for their location the next time the Data Access Portal is loaded. This endpoint should only be called if the “use_user_location” config option in the “main” config section has been set to “true”.
- Status Codes
200 OK – OK
- POST /accessrequests
- Request JSON Object
contactinfo (string) – If the ‘access_request_contactinfo’ config-option in the ‘gdpr’ config-section is set, this field must be specified, and contain a mobile phonenumber or email address.
deleteRequest (boolean) – Specified if this is a delete-request or not (required)
extraFields (object) – This is a mapping from field-id to field-value for any extra fields that the user has filled in. The field-ids must be the same as the ones defined in the ‘extra_access_request_fields’ config-option in the ‘gdpr’ config-section.
lang (string) – The language that is currently selected in the browser (required)
publicKey (string) – The public key to use when encrypting the user’s data. (required)
- Status Codes
200 OK – The response is just an empty json object “{}”.
- POST /access_request_validate_extra_fields
- Status Codes
200 OK – OK
400 Bad Request – validation failure
- POST /accessrequest_login
This is called by the client after the user has logged on (only when an accessrequest has been made previously). This will allow the client to read the data associated with the accessrequest that belongs to the specified publicKey.
- Status Codes
200 OK – OK
- Response JSON Object
authentication_providers[].icon (string) – Optional. An url to the icon that should be used on the login-button for this provider.
authentication_providers[].id (string) – The unique id of the provider (required)
authentication_providers[].login_url (string) – The url to go to to start authenticating with this provider (required)
can_download_gdpr_data (boolean) – True if the user has some gdpr data available for download. (required)
can_edit (boolean) – True if this user is allowed to edit the configuration settings. (required)
can_login (boolean) – True if the various login-buttons should be displayed. (required)
can_logout (boolean) – True if the “Logout”-button should be displayed. It is not possible to log out when using the x-remote-user authentication, since the idea is that the browser should just pass along the authentication-info the user used to log into the desktop session. (required)
can_see_debug_controls (boolean) – True if the user should be allowed to view the various debug controls by setting the “showdebugcontrols” url parameter. (required)
contactinfo (string) – The user’s contact information if available, otherwise an empty string. This can be an email-address or a mobile phone number. (required)
default_field_visibility (integer) – This is 0 (zero) if all item fields are to be hidden by default. If this is 0, only the fields that have been explicitly set to visible will be displayed to the end-user. If this is 1, all item fields will be displayed by default, and only the fields that has been explicitly set as “not visible” will be hidden from the user. (required)
domain (string) – This is only used the user is authenticated via an “X-Remote-User” request header. In that case the header-value typically contains both a domain and a username. (required)
email (string) – The user’s email-address if available, otherwise an empty string. (required)
gdpr_hide_delete_me_button (boolean) – True if the GDPR “Delete me” button should be hidden. In some cases this button doesn’t make a lot of sense. (required)
gdpr_mode (boolean) – True if the DAP is being used as a gdpr portal. (required)
is_authenticated (boolean) – True if the current user has been authenticated (required)
language (string) – The language the DAP has been configured to use. (required)
name (string) – The human-readable name of this user if available, otherwise an empty string. (When the user is logged in with an openid connect authentication provider we usually get the user actual name in addition to the (possibly cryptic) user_id.) (required)
otp_login_with_email (boolean) – True if the login via a One Time Password on email is enabled. (required)
otp_login_with_sms (boolean) – True if the login via a One Time Password on sms is enabled. (required)
use_profilepage_as_startpage (boolean) – (required)
user_id (string) – The internal (possibly crypting) id of the user. (required)
user_selectable_languages[].display_name (string) – The human-readable name of the language (in that language) (required)
user_selectable_languages[].language_code (string) – (required)
userobject_id (string) – The id of the document that represents the currently logged in user. (required)
- GET /changerequests
Gets all changerequests for the specified document
- Query Parameters
subject (string) –
- Status Codes
200 OK – OK
- Response JSON Object
[][].datatype (string) – (required)
[][].literal (boolean) – (required)
[][].object (string) – (required)
[][].property (string) – (required)
[][].subject (string) – The id of the change-request (required)
- GET /configuration
Returns a html page that lets the user view the current configfile settings.
- Query Parameters
content_only (string) – If this is set to ‘true’, only the content-part of the html-page will be returned (i.e no enclosing <html> or <body> tags). This is used when the Management Studio wants to embed the DAP config on a page.
- Status Codes
200 OK – OK
- GET /configuration/{config_file_path}
Returns the specified configuration file in the base configuration layer. Files in the base layer overrides the configfiles in all other config-layers.
- Parameters
config_file_path (string) – The full file path of the configuration file. Note that the openapi spec doesn’t support ‘rest of path’-type parameters, so this parameter-definition isn’t 100% accurate. This parameter should not actually be url-escaped in any way. For instnace, to retrieve the configfile in the folder “/sesam/data/conf/42/css/temp/test.css”, the url used should just be
https://<dap-backend>/configuration/conf/42/css/temp/test.css.
- Status Codes
200 OK – The response-body is the content of the specified file. If the file didn’t exist, the response-body will be empty.
- PUT /configuration/{config_file_path}
Uploads the specified configuration file.
- Parameters
config_file_path (string) – The full file path of the configuration file. Note that the openapi spec doesn’t support ‘rest of path’-type parameters, so this parameter-definition isn’t 100% accurate. This parameter should not actually be url-escaped in any way. For instnace, to retrieve the configfile in the folder “/sesam/data/conf/42/css/temp/test.css”, the url used should just be
https://<dap-backend>/configuration/conf/42/css/temp/test.css.
- Query Parameters
validate_only (boolean) – If this is set to “true”, no actual changes will be done to the configuration; only the validation checks will be run.
- Status Codes
200 OK – The file was uploaded ok. Note that the response may still contain configuration errors.
403 Forbidden – The file could not be uploaded, since that would prevent the current user from making any more modifications to the configfiles.
- Response JSON Object
config-errors[].level (string) – The severity of the problem. (required)
config-errors[].msg (string) – A human-readable description of the problem. (required)
current-user-would-be-locked-out (boolean) – True if the attempted change to the file would result in the current user not being able to modify the configfiles any more. (required)
is-valid-config (boolean) – True if the resulting set of configuration files contains no errors. (required)
- DELETE /configuration/{config_file_path}
Deletes the specified configuration file.
- Parameters
config_file_path (string) – The full file path of the configuration file. Note that the openapi spec doesn’t support ‘rest of path’-type parameters, so this parameter-definition isn’t 100% accurate. This parameter should not actually be url-escaped in any way. For instnace, to retrieve the configfile in the folder “/sesam/data/conf/42/css/temp/test.css”, the url used should just be
https://<dap-backend>/configuration/conf/42/css/temp/test.css.
- Query Parameters
validate_only (boolean) – If this is set to “true”, no actual changes will be done to the configuration; only the validation checks will be run.
- Status Codes
200 OK – The file was deleted ok. Note that the response may still contain configuration errors.
403 Forbidden – The file could not be deleted, since that would prevent the current user from making any more modifications to the configfiles.
- Response JSON Object
config-errors[].level (string) – The severity of the problem. (required)
config-errors[].msg (string) – A human-readable description of the problem. (required)
current-user-would-be-locked-out (boolean) – True if the attempted change to the file would result in the current user not being able to modify the configfiles any more. (required)
is-valid-config (boolean) – True if the resulting set of configuration files contains no errors. (required)
- GET /configuration/conf/{config_layer}/{config_file_path}
Returns the specified configuration file.
- Parameters
config_layer (string) – The configuration layer of the file. Configuration files in higher-numbered layers override configfiles in lower-numbered layers.
config_file_path (string) – The full file path of the configuration file. Note that the openapi spec doesn’t support ‘rest of path’-type parameters, so this parameter-definition isn’t 100% accurate. This parameter should not actually be url-escaped in any way. For instnace, to retrieve the configfile in the folder “/sesam/data/conf/42/css/temp/test.css”, the url used should just be
https://<dap-backend>/configuration/conf/42/css/temp/test.css.
- Status Codes
200 OK – The response-body is the content of the specified file. If the file didn’t exist, the response-body will be empty.
- PUT /configuration/conf/{config_layer}/{config_file_path}
Uploads the specified configuration file.
- Parameters
config_layer (string) – The configuration layer of the file. Configuration files in higher-numbered layers override configfiles in lower-numbered layers.
config_file_path (string) – The full file path of the configuration file. Note that the openapi spec doesn’t support ‘rest of path’-type parameters, so this parameter-definition isn’t 100% accurate. This parameter should not actually be url-escaped in any way. For instnace, to retrieve the configfile in the folder “/sesam/data/conf/42/css/temp/test.css”, the url used should just be
https://<dap-backend>/configuration/conf/42/css/temp/test.css.
- Query Parameters
validate_only (boolean) – If this is set to “true”, no actual changes will be done to the configuration; only the validation checks will be run.
- Status Codes
200 OK – The file was uploaded ok. Note that the response may still contain configuration errors.
403 Forbidden – The file could not be uploaded, since that would prevent the current user from making any more modifications to the configfiles.
- Response JSON Object
config-errors[].level (string) – The severity of the problem. (required)
config-errors[].msg (string) – A human-readable description of the problem. (required)
current-user-would-be-locked-out (boolean) – True if the attempted change to the file would result in the current user not being able to modify the configfiles any more. (required)
is-valid-config (boolean) – True if the resulting set of configuration files contains no errors. (required)
- DELETE /configuration/conf/{config_layer}/{config_file_path}
Deletes the specified configuration file.
- Parameters
config_layer (string) – The configuration layer of the file. Configuration files in higher-numbered layers override configfiles in lower-numbered layers.
config_file_path (string) – The full file path of the configuration file. Note that the openapi spec doesn’t support ‘rest of path’-type parameters, so this parameter-definition isn’t 100% accurate. This parameter should not actually be url-escaped in any way. For instnace, to retrieve the configfile in the folder “/sesam/data/conf/42/css/temp/test.css”, the url used should just be
https://<dap-backend>/configuration/conf/42/css/temp/test.css.
- Query Parameters
validate_only (boolean) – If this is set to “true”, no actual changes will be done to the configuration; only the validation checks will be run.
- Status Codes
200 OK – The file was deleted ok. Note that the response may still contain configuration errors.
403 Forbidden – The file could not be deleted, since that would prevent the current user from making any more modifications to the configfiles.
- Response JSON Object
config-errors[].level (string) – The severity of the problem. (required)
config-errors[].msg (string) – A human-readable description of the problem. (required)
current-user-would-be-locked-out (boolean) – True if the attempted change to the file would result in the current user not being able to modify the configfiles any more. (required)
is-valid-config (boolean) – True if the resulting set of configuration files contains no errors. (required)
- GET /configuration_localization_strings
Returns a list of all the localizations strings. This endpoint is used by the translation gui in the management studio. The ordering reflects the ordering in the hardcoded “databrowser.ini”-file.
- Status Codes
200 OK – OK
- Response JSON Object
[].defaults (object) – This is a mapping from language (“en”, “no”, etc) to the hardcoded hardcoded default value of this localization string for that language. This is the value that will be used if no end-user defined translation of this string has been made. (required)
[].description (string) – A description of what the localization string is used for. (required)
[].id (string) – The id of the localization string (required)
[].overrides (object) – This is a mapping from language (“en”, “no”, etc) to the end-user specified translations of this localization string for that language. The values here will override the values in the “defaults” mapping. (required)
- PUT /configuration_localization_strings/overrides/{language}/{localization_string_id}
Stores an overridden value for the specified localization string. This endpoint is used by the translation gui in the management studio.
- Parameters
language (string) – The languagecode (“no”, “en”, etc)
localization_string_id (string) – The id of the localization string.
- Status Codes
200 OK – OK
- DELETE /configuration_localization_strings/overrides/{language}/{localization_string_id}
Removes any overridden value for the specified localization string. This endpoint is used by the translation gui in the management studio.
- Parameters
language (string) – The languagecode (“no”, “en”, etc)
localization_string_id (string) – The id of the localization string.
- Status Codes
200 OK – OK
- GET /gdpr/fileblob_download/{file_id}
- Parameters
file_id (string) – The id of the file. This value must be url-encoded.
- Status Codes
200 OK – OK
- GET /configuration_redis
Returns the configuration triples that are stored in redis.
- Status Codes
200 OK – OK
- GET /configuration_fields_config
Returns the current field-config settings. This is used by clients that need to do client-side field-formatting (for instance when the databrowser is used as a GDPR portal, and we do client-side decryption of fields.
- Status Codes
200 OK – OK
- GET /status
This endpoint returns misc information about the databrowser.
- Status Codes
200 OK – The response is just an empty json object “{}”.
- Response JSON Object
feature-level (integer) – API feature level used by the Management Studio GUI for backwards compatibility. (required)
start_time (string) – A human-readable datetime string that specified when the databrowser backend was started (required)
uptime (string) – A human-readable string that described how long the databrowser backend has been running. This value is derived from the “start_time”-value, and it just included as a convenience. (required)
version (string) – The git-commit that this DAP instance was built from. (required)